Monday, October 31, 2011

Alpha Version Progress Report

Progress Report
Up to now, we have finished all of the requirements in Alpha Version:
Procedural generation of tunnel
Distribution and generation of obstacles and accelerators
Collision between character and obstacles
Scoring system
Sound effects

We have also implemented some of those in Beta Version:
Webcam based movement control
Dizzy and motion blur effects
Menu GUI

In the next few weeks, we will be working on:
Other Beta Version requirements, including dual game mode, diverse bonus/ obstacles and custom shaders, etc.
We will also optimize the existing mechanism and graphic effects according to the feedback.

Game Demo:

Motion Controller Detail

Idea:
Threat the frame of player(s) as a texture and analyze the average direction of the contour edges of the player(s).

Assumptions:
1. Players can be distinguished from background because they are moving. (Even if they looks still, people have subtle movement other than the background.)
2. People can be seen as sticks. (They are tall, long, and most of the edges are vertical if they stand still.)

Extract Moving Things:
That is a simple trick, because the background image never moves (Assumption 1), we can simply use the difference between a frame and its previous frame.


Smooth and Get Gradient Map:
We can use a gradient convolution kernel {-1, 1} to get the result. We can see that the horizontal lines are obvious after convoluted with a Y direction gradient, and the vertical lines are obvious after X direction gradient.


Get the Interesting Points:
We can see from the gradient kernel, even if the background is subtracted, there is still a lot of noise comes from the background, that is due to contrast change from frame-to-frame brightness change.  So we need to set a threshold that means, if the edge is more obvious than something, I should pay attention to it. A simple way to measure how the edge is obvious is add the magnitude of the x-and-y-direction gradient up. (If Gx*Gx + Gy*Gy > threshold, the point in counted as a interesting point.)


Calculate the Point Directions:
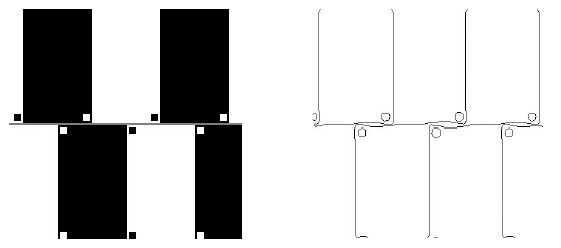
Here is an example of how to calculate the local direction of edges:
The upper left matrix is for a simple edge, the upper right one is the smoothed edge with a Gaussian kernel of size 3, while the lower left is the convolution result with a x-direction gradient kernel and the lower right is the the convolution result with a y-direction gradient kernel.
As we known that if the edge is vertical, the x direction convolution response will be high and vice versa, we can get the direction of the edge by calculate the tangent value of x and y direction convolution results.
Say, we want to know direction of the point (3, 3), we can simply use atan2(-16, -16) = 45 degree.

Calculate the Average Direction of the Whole Frame
Knowing the method above, we can simply accumulate all the direction values and calculate the average of them to get the direction of the whole frame.


HUD in Game

Idea:
We want to Create Really Simple but cool HUD in game to show the current score and speed level of the player. Because our game is pretty like the racing game, the idea of build a speedometer like HUD comes to our mind first.

Rotate the Pointer:
We started to add our HUD from a Unity GUI Texture, but the problem is, it is not allowed to rotate any non-3D GUI Textures in Unity, while we definitely don't want to use mesh textures because that is not cool...
So one way to rotate the GUI Texture is like that:

        posPointer = new Vector2(transform.localPosition.x - sizePointer.x * 0.5f, transform.localPosition.y);
        rectPointer = new Rect(posPointer.x - sizePointer.x * 0.5f, posPointer.y - sizePointer.y * 0.5f, sizePointer.x, sizePointer.y);
        pivotPointer = new Vector2(rectPointer.xMin + rectPointer.width * 0.5f, rectPointer.yMin + rectPointer.height * 0.5f);
        GUIUtility.RotateAroundPivot(angle, pivotPointer);
        GUI.DrawTexture(rectPointer, pointer);
        GUI.matrix = matrixBackup;
        GUI.DrawTexture(rectSpeedometer, speedometer);

It Rotates a Texture2D like the OpenGL way, and the result is pleasing.

Result:
Here is a screenshot of our HUD:


Start Menu GUI Detail

We have implemented most parts of start menu GUI and connected it to the game scene.

As mentioned before, we use doors in the tunnel to act as the menu GUI for the game. Now we have three doors, which are:

Main Menu with four buttons as "Game Mode""Options""High Scores""Quit Game"
Game Mode Menu with three buttons as "Classic Mode""Time Mode""Go Back"
High Scores Menu with "Go Back" Button


We have also added some more detailed animations to the menu, for example, the button will "stand up" when a user puts the mouse on it. Light will also be turned on and gear will spin before the door opens.


We will apply the animations to all of the parts of the doors and implement all of the functions including Options and High Scores. We will also modify the scene transfer to make it smoother instead of  convert the camera from the menu to the game directly.

Thursday, October 27, 2011

Procedural Tunnel Generation Detail

//FIXME
OMG! alpha version presentation is coming!!!
Let's focus on games rather than words!
Details will come soon :-)

Tuesday, October 18, 2011

Challenges Encountered in Procedural Tunnel Generation

In Sliding in the Deep, the core development task is to procedurally generate the tunnel. In our design, the tunnel has two varying parameters, the longitudinal direction and latitudinal curvature. We want to make our tunnel turn left/right/up/down randomly. And its shape can also vary between a complete circle and a plane. Player will move inside the tunnel if its curvature is positive and outside the tunnel if its curvature goes negative. We want the tunnel direction and curvature change smoothly.

The basic idea is to derive a section of tunnel from a procedurally generated cubic Bezier curve, namely, the guide curve. This guide curve will determine the general shape of this section of tunnel. Its start point coincides with the end point of last guide curve. Its end point is randomly picked. We want our tunnel to always develop along the +z axis, so we keep our tangent of two endpoints be (0, 0, 1) * constant.

The basic idea is easy and straightforward. But we did meet challenging problems when implementing this idea:

1. How to describe the tunnel’s curvature?

Most of the time, the tunnel is an arc of a circle (or a complete circle). But things goes messier if current curvature is 0, which means the tunnel degenerated to a plane. We can no longer treat it as arc since its radius will be infinity.

2. How to ensure uniform speed?

The speed of player moving along the curve is an essential element in our game. It will only be affected by the interaction between player and obstacles or accelerators. We actually want our player move a contestant length of curve in each step (If it doesn’t get accelerated or hit an obstacle). If using Bezier curve, the naive method to deal with player movement is to use the Bezier parameter t. But for Bezier curve, uniform change in t doesn’t mean uniform speed.

3. The workload of tunnel generator is not uniform. Next section only needs to be generated if player get near to the end of current section. But the generating process needs heavy computation. Simply call the generating function when player move towards the end will make the game get stuck for a very short time. This is annoying and will make our user experience quite bad.

The method we used to solve those problems and more implementation details will be given in the following blog.

Automatic Tunnel Generation Script Done

Result Demo:


There are aliasing problems for the recorded video because the frame rate of Windows Encoder Express is only 10 fps... The game experience is continues and fluent.

Sunday, October 16, 2011

GUI Design Concept

Along with the game, we are also designing the GUI in a tunnel. For each scene, there is a closed sci-fi door inside of the tunnel. There are several buttons on the door which also act as buttons of the GUI. We have designed the model of the door and now we are working on the textures and shaders.(shown in picture 1)
 picture 1

Since the buttons are real models instead of GUI elements, We plan to use Unity's raycasting command to tell which button the user presses. When the user clicks on a button, a related light will be shining and the gear in the middle will be spinning, indicating the door is going to open. (shown as picture 2)
 picture 2

After all of the animations, the door will open and the scene will go through piece of tunnel and reach another door which carries some other buttons. (shown in picture 3)
picture 3

Although the GUI is also in the tunnel, the position and angle of the camera are different from those in game because we want to focus on the buttons on the door to make it more convenient. 

In the next few days we will implement the textures and shaders to the scene and add script to the models for user control.

Cheers!

Friday, October 7, 2011

Test of Unity Runtime Mesh Generating

Here I wrote a script which generates 24000 triangle mesh every frame. (Although the are not changed, I updated them every frame, I just want to ensure that my machine is power enough with generating these by Unity)

And I change the render setting, zoom in the z-far clip plane, attach a small keyboard control script to the camera.

The demo shows the result:

Wednesday, October 5, 2011

Find a simple illustration of our game concept

There is an old but interesting game called Heilopter Game
http://www.addictinggames.com/arcade-games/helicoptergame.jsp

In this game, players are controlling the height of the helicopter by clicking the left button of mouse.
There are many similarities between our game and this one:
1. One degree of freedom.
2. Endless stage.
3. Dynamically generated scene.
4. Obstacle avoidance
5. Main goal of the game is getting higher score (by keeping the avatar not die...).

The difference between ours and the helicopter are:
1. We have 3D scenes and fancy graphics effects.
2. We provide body movement controllers.
3. We add more elements like acceleration strips, dynamic bonus/obstacles.
4. We have physical-based effects.

We think sticking with classic game ideas is a good start.
All we should do is adding a lot of new elements to a simple concept.

-Keep the concept easy and make the game fun by adding more elements. That's the guideline we always want to follow.

Hope you enjoy the helicopter game:)

Tuesday, October 4, 2011

Test Your Eyes: Which One Makes You More Dizzy? (It Comes AGAIN!)

From the feedback of the last post of "Test Your Eyes", the participants are feeling strong difference between polygon tunnel and cylindrical tunnel, almost all the feedback are saying polygon tunnel makes them more dizzy.

The only difference between polygon tunnel and cylindrical tunnel is the former has rapid changing corners. And my assumption is people get sick from integrate the corner change.

But from the implementation aspect of view, polygons are easier to use if we want generate dynamic game scenes, and low-polygons are always cheaper for rendering.

Inspired by last source in optical illusion, we decide to change the texture pattern in the tunnel and see how we can decrease the dizzy effects in the polygon tunnel.


And here's the result, let's test our eyes again. (These two shares the same mesh structure, the only difference is the texture)

Interesting Source: Optical Illusions

There is a research called "Optical Illusions" posted at
http://www.cfar.umd.edu/~fer/optical/index.html

I just pick some related results to our game design. Basically the reason of the following illusion is called by inappropriate edge smoothing and integration by human eyes.

The café wall illusion consists of a black and white checkerboard pattern with alternating rows shifted one half of a block and with thin gray mortar lines separating the rows. The pattern creates the illusion of the horizontal mortar lines being tilted. The effects of smoothing on the pattern can explain this illusion.
If we take a closer look at the pattern, we find that the horizontal gray lines create two different types of edges because of their proximity to the black and white blocks. There are gray lines between white and black solid areas (type 3 edges) and there are gray lines between two black areas or gray lines between two white areas (type 2 edges).

(If you want to look up what is type 2 edge and type 3 edge, please go to http://www.cfar.umd.edu/~fer/optical/smoothing1.html)


If we smooth the image and then apply edge detection, we obtain edges as shown below.


As you can see, the smoothing distorts the edges to bulge where the horizontal mortar line is between two areas of the same gray value and to come closer together otherwise. A local edge detector produces small edge segments, which are tilted in the same direction as perceived. These edge elements are then linked by more advanced computational processes into lines of longer extent. Assuming that these processes are computationally approximations using as input the position and the orientation of the short edge elements, they will derive tilted mortar lines.
Based on the understanding of how the illusion works we should be able to counteract the effect by introducing new elements into the picture that balance out the illusion. We do this by inserting white and black squares into the corners of the tiles. As you can see, this greatly reduces the illusion.


If we zoom in and look at the edges we notice that the added squares compensate for the drifting of the lines. There is still “waviness” to the edges, but it is too weak to be perceived.


Monday, October 3, 2011

Test Your Eyes: Which One Makes You More Dizzy?


Rolling with small angle Vs. Rolling around the whole tunnel


Object nearby Vs. Object faraway


Polygon tunnel Vs. Cylindrical tunnel

The Demo of High Concept

High Concept

Sliding in the Deep
Keen Sun, Robin Feng, Tiantian Liu

High Concept
Sliding in the Deep delivers a stunning motion-controlled tunnel experience. Test your agility in an ultimate challenge with smooth 3D graphic. Concentrate, keep your body moving and score as high as possible!
Features
  • Highly Immersed Game Experience: We allow players use body movement to control the avatar, together with the first person camera to make players wholly immersed. We are not going to use Kinect because we would like to use least expensive devices but still bring the users maximum involving experience. We will capture the user’s face position and trace it during the game to control the avatar.
  • Diverse Bonus/Obstacles: There are many kinds of obstacles with different shapes and sizes which will make benefits/troubles to players.
  • Fancy Graphics Effects: Smooth and appealing visual effects give players the best sense of speed. Players will get dizzy when hit the obstacles. The view will be blurred when get accelerated. The textures of the tunnel, sliding speed of the player and the locations of the obstacles will be carefully designed to avoid inconvenient feelings.
  • Dynamic Scene Generation: Game scenes are generated randomly and dynamically. Players will never get tired because they can never enter the same tunnel again.
  • Undo IT When Things Go Wrong: We provide a flashback function which gives players limited opportunities to restart at some previous time. Hope they won’t make the same mistake again.
  • Dual game mode: We will implement two game modes, classic mode and time mode. In classic mode, players have limited lifes, once they collide with some obstacles, they lose a life and game is over if they lose all the lifes. In time mode, game will ends after certain time, and players are spurred to run as much far as possible.

Player Motivation
Slide as deep as possible in the mysterious tunnel. Avoid collision with randomly raising obstacles. Get as more bonus as possible.
Genre
Tunnel speedy exploration / Somatic Game
Target Customer
Players who are looking for the ultimate immersed control experience, sense of speed and wonderful graphics.
Competition
None.
Unique Selling Points
  • Highly accurate and interesting control method
  • Fancy visual effects
  • Dynamically generated scene
  • Flashback function
  • Dual game mode

Target Hardware
PC. For the best experience,  a webcam is needed.
Design Goals
Simple: Relatively slow sliding speed with fewer obstacles create an easy way to learn and play. Hints will also appear before the obstacles appear.

Hot: Fast action. Hints disappear and  more obstacles come up with various shapes, sizes and combinations.

Deep: Even faster if the player hits a accelerator. The tunnel will change more dynamically. Obstacles might move instead of stand still. Other tools are also available to create special effects like convert left/right direction.